What Problem is Digital Workflow a Solution for?
- Traditionally, shops underutilize technicians’ availability, because tracking technician progress on jobs, approvals, and part arrivals requires too much time and effort from service advisors who cannot update all info needed in real-time. Thus, they make best guess assumptions leading to time buffers added to schedules for the day. This often amounts to thousands of dollars left on the table each month. AutoVitals’ workflow technology provides real time progress on jobs, and other information so shops can make full use of their technicians. And they love it, since their paycheck gets bigger too.
- Instead of service advisors tackling the most current interruption from the boss, technicians or customers, the workflow and task management technology enables them to work on the most important tasks first and ensures they do not miss any. This leads to better management of customer expectations resulting in higher customer retention.
- Instead of requiring service advisors to manage too much information in their heads or on paper, the workflow management technology provides clear oversight available to everyone in the shop. In traditional shops, the Service Advisor has to always be available or the workflow will come to a halt. This often leads to single point of failures or wait time and negatively impacts technician productivity, and shop revenue. The workflow management enables a number of new possibilities:
-
- Specialization of roles so staff focus on different responsibilities
- Service Advisors go to lunch without a need for managing proxies
What best practices are recommended when using Workflow Management?
DOs –
- Use both the tech view and workflow view
- Add workflow steps when appropriate
- Require techs to have their work orders open on their tablets while working on a vehicle
Don’ts –
- Do not add workflow steps when you can manage the process using a Special Markers instead.For example, the “Waiting for Parts” step can take care of ordering parts, and waiting for those parts to arrive. Instead of creating two different steps for this, a special marker can be added with a countdown timer of when the part should arrive once ordered.
The Features
Standard/Default Workflow Configuration
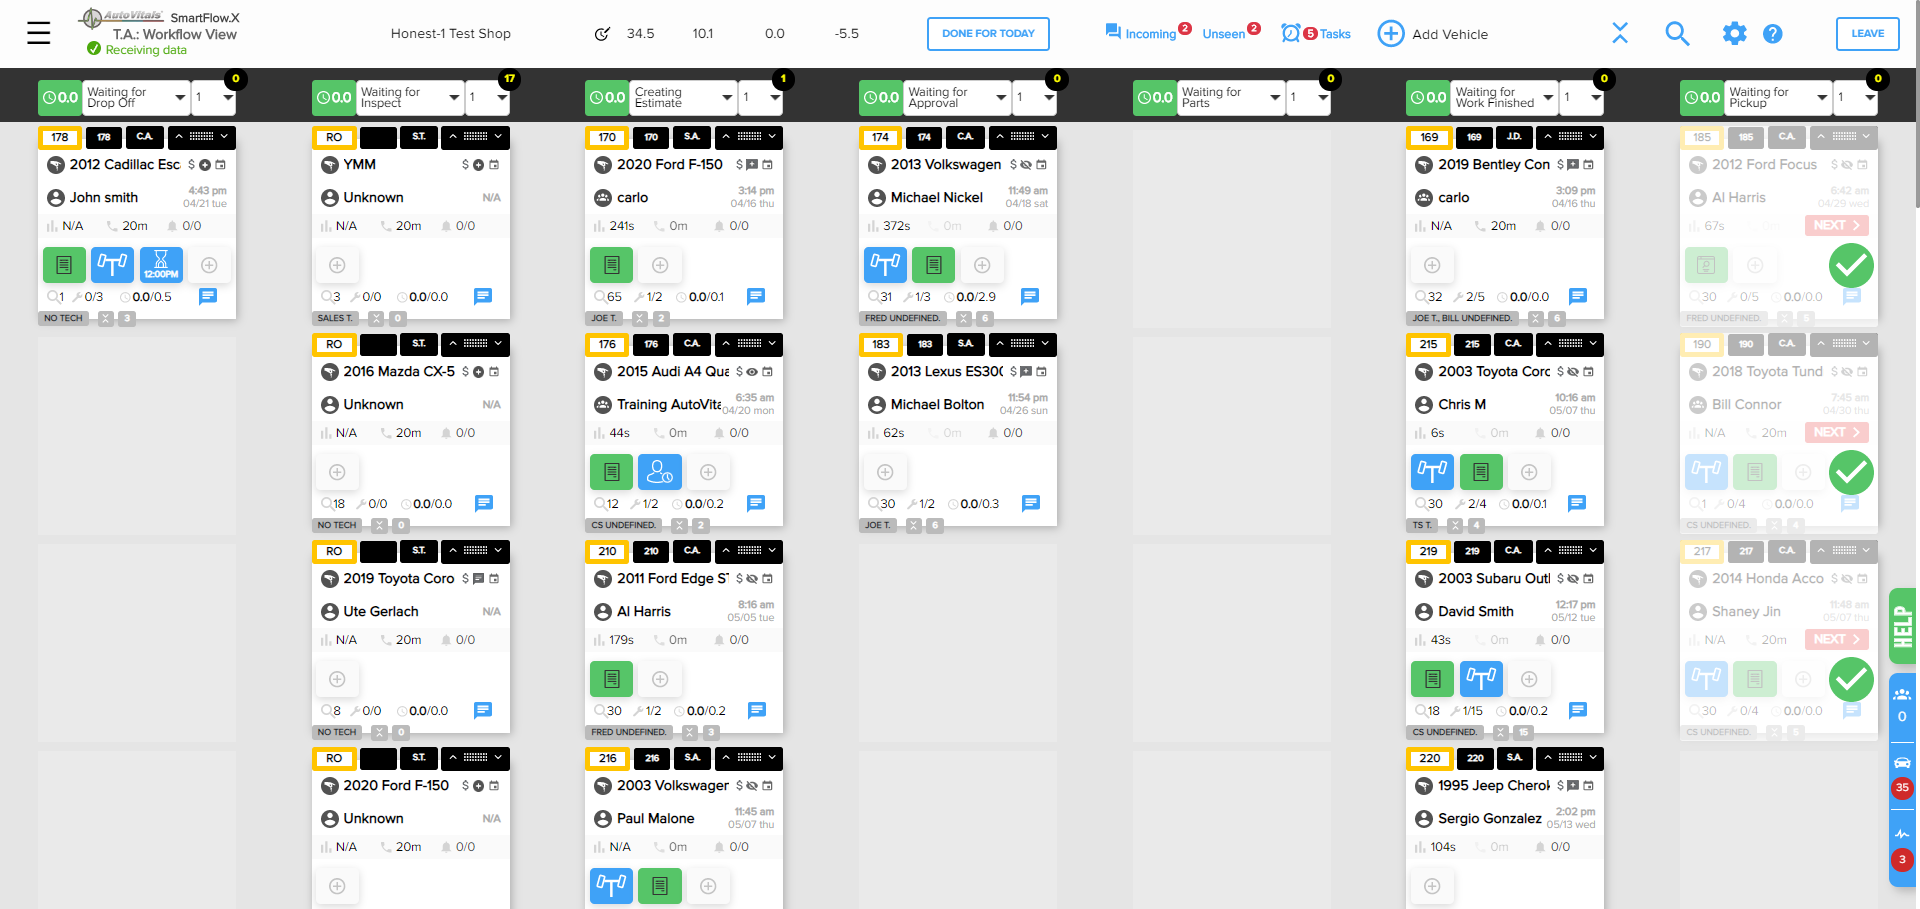
How to Use Each Workflow Step:
Waiting for Drop Off: Estimates (if configured) in the PoS and Appointments for today will appear in this column.
Waiting for Inspect: Once an estimate has been converted to a repair order or a repair order is created in your PoS the vehicle will automatically appear in this step.
- TVP: Assign the technician
- Tablet: Technician completes the inspection and any initial work assigned and sends a Smart Alert on the Inspection labor line once done with the inspection. The tech should make no further changes to the inspection unless instructed to by the service advisor.
- TVP: Receive alert and task that the inspection/initial diagnosis is complete. Browse the inspection first and if anything is missing send it back for the tech for completion. If all looks good, move the vehicle to the Creating Estimate step.
Creating Estimate: You must move the vehicle to the “Creating Estimate” step to freeze the work order in AutoVitals while building the estimate in your PoS
- TVP: Review and Edit the Inspection
- TVP: Click the Send to SmartFlow Add-on button if using two way integration to aid in your estimate building process
- TVP:Build out the estimate in your POS
- TVP:Move the vehicle to the Waiting for Approval step
- Tablet: Technician continues working on any incomplete initial work the vehicle came in for
Waiting for Approval
- TVP:Email/text the inspection to the customer
- TVP: Countdown timer on the Vehicle Tile and task remind you to call the customer 20 minutes after you sent the inspection if they have not called you already. This allows the customer time to review the findings, and be ready to make a buying decision when they call you rather than feeling sales pressure when you call them immediately.
- POS: Once approval is received make and adjustments to the work order in the PoS and order parts
- TVP: Move the vehicle to Waiting for Parts
- Tablet: Technician continues working on any incomplete initial work the vehicle came in for
Waiting for Parts (Not included in the Default Configuration but Recommended)
- TVP: Set a special marker countdown timer for when the parts are expected to arrive
- TVP: Once parts arrive and additional jobs are ready to be completed move the vehicle to Waiting for Work Finished
- Tablet: Technician continues working on any incomplete initial work the vehicle came in for or N.A.
Waiting for Work Finished
- TVP/Tablet: By default all additional jobs are assigned to the default technician, unless this workflow step is not set for “Automatic Job Approval”.
Note: If you want to make dispatching decisions again (and not assign the work to the same technician), you should not make this step automatically approve jobs in the workflow settings. In this case, you get a task to assign any unassigned jobs once the vehicle is moved to this workflow step.
- Tablet:Tech will receive an alert of new work to be completed
- Tablet:Once completed, tech will submit the vehicle
- TVP:Receive alert and task that the work order is complete
- TVP:Review Work and make any adjustments to the work order in the PoS
- TVP: Move vehicle to waiting for Pickup
Waiting for Pickup
- TVP: Notify the customer that their vehicle is ready for pickup
- TVP: Once the customer comes in to pick up their vehicle, use the “Next” button on the vehicle tile or CRM next visit tab to review the visit and schedule the next visit or set the expectations for what they will see on their service reminder.
NOTE: Many of the notifications to the customer can be automated so that once you move the vehicle into a new workflow step, an email or text is sent to the customer. For example, the customer can automatically receive the inspection report when moving into Waiting for Approval or a pickup notification when moving into Waiting for Pickup.
What are typical workflow steps shops add based on their different staff roles and type of shop?
Quality Control
- Quality Control step:This is added after the Waiting for Work Finished step
- Shops differ in how they complete this step (and some complete a digital QC inspection), but the step could be an appropriate addition if someone other than the tech completing the work does any of the following after work is submitted:
- Reviews the work completed (and reassigns the work to the tech if needed)
- Verify all wheels are torqued
- Removes floor mats
- Checks for grease and fingerprints,
- Applies oil change stickers
- Completes a final test drive to make sure no warning lights come on.
- Inserts a gift bag
Shop Sublets certain services to other shops
- Sublet step: If a large amount of vehicles are sublet this let’s the shop know the vehicle is not on site. Through special markers you can note where it sublet to, the contact information for that location, and when it is expected back
Shop does a secondary dispatch through a Shop Foreman
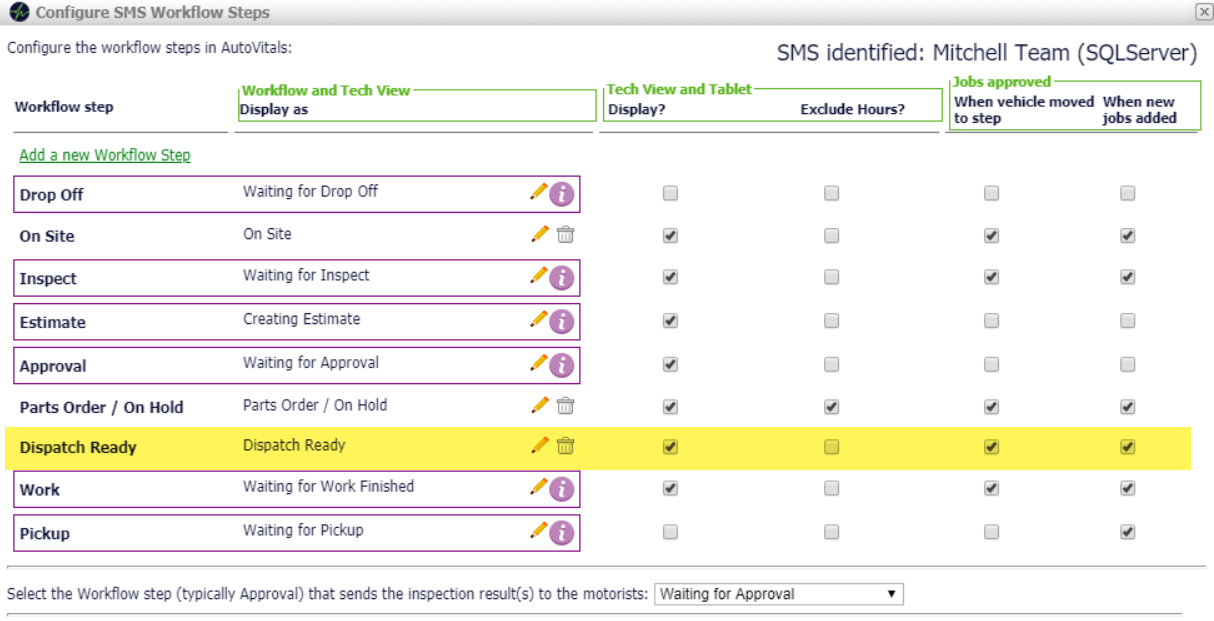
- Dispatch Ready step: This is added if a Shop Foreman handles the dispatching of more complex services that were up-sold after the initial work is completed. It is added after the Waiting for Parts Step.
Shops that special order parts, and return the vehicle to the customer while waiting for parts to arrive
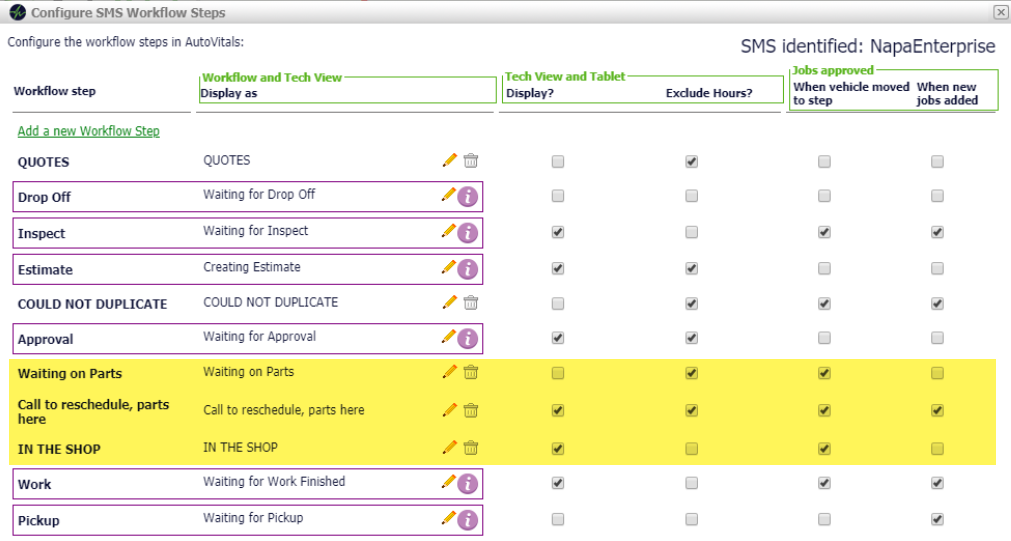
- The Call to Reschedule, parts here: Indicates the parts are here and the customer needs to be contacted to bring the vehicle back
- In the Shop: Indicates the vehicle is back on site and can be dispatched
How do technicians experience the digital workflow on their tablets?
Active Vehicles Screen on the Tablet/Phone App:
The tech’s active vehicles screen displays work orders in the order they need to be worked on based on the order needed to satisfy the customer. This is set based on the order indicated on the Tech’s column on Tech View of the TVP.
Idle Vehicles Screen on the Tablet/Phone App:
The tech’s idle vehicles screen is a holding area to remove clutter from the active screen. It allows the technician to get a summary view of all their work even if it does not need immediate work performed. A vehicle can easily be reactivated (and moved to active) from the Idle screen if the service advisor messages the technicians that something further needs to be noted on the work order like inspection edits, documentation on a job, or updating job completion status.
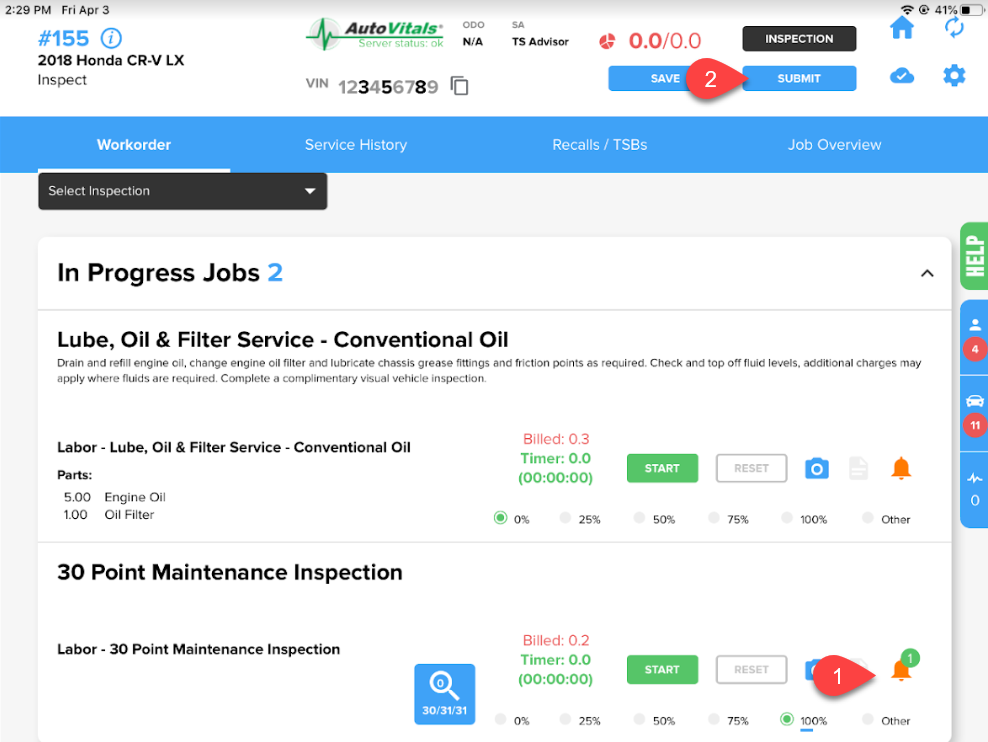
When should the technician “submit” a vehicle and when should they use the “smart alert” button
- The smart alert button (1) should be used to send the service advisor a snapshot of information on particular labor lines when they still need to continue working on the vehicle. For example, the technician should click the smart alert button on the inspection job when it is complete. This allows the service advisor to review, edit, estimate,and send the inspection to the customer while the tech continues to work on any remaining initial work.
- The submit button (2) should be used when all jobs are complete and marked 100% done, or when there may be remaining work to be completed but there is something blocking the technician
How does the Not Active column work on Tech View?
The purpose of the “Not Active” column in tech view is to show vehicles that have not been closed out but are not actively being worked on by techs. It would be used if a vehicle cannot be found in Tech View, but the shop needs to find information about it. However, the vehicle can also be accessed in Workflow View.
The “Not Active” column in Tech View includes all vehicles that are in a workflow step that cannot be worked on by the technician once all the previously authorized jobs have been completed.. Examples are the Waiting for Pickup or Sublet steps.
Impact the Workflow Configuration Has on Labor Inventory Management
Using the workflow steps in your digital workflow process goes hand in hand with effectiveley maximizing your technicians’ time in the shop. See here for more information about how you can use digital workflow to improve efficiency in the shop:
How to manage keys when going paperless
Coming Soon
What Settings Impact Digital Workflow Behavior
Adding a Workflow Step
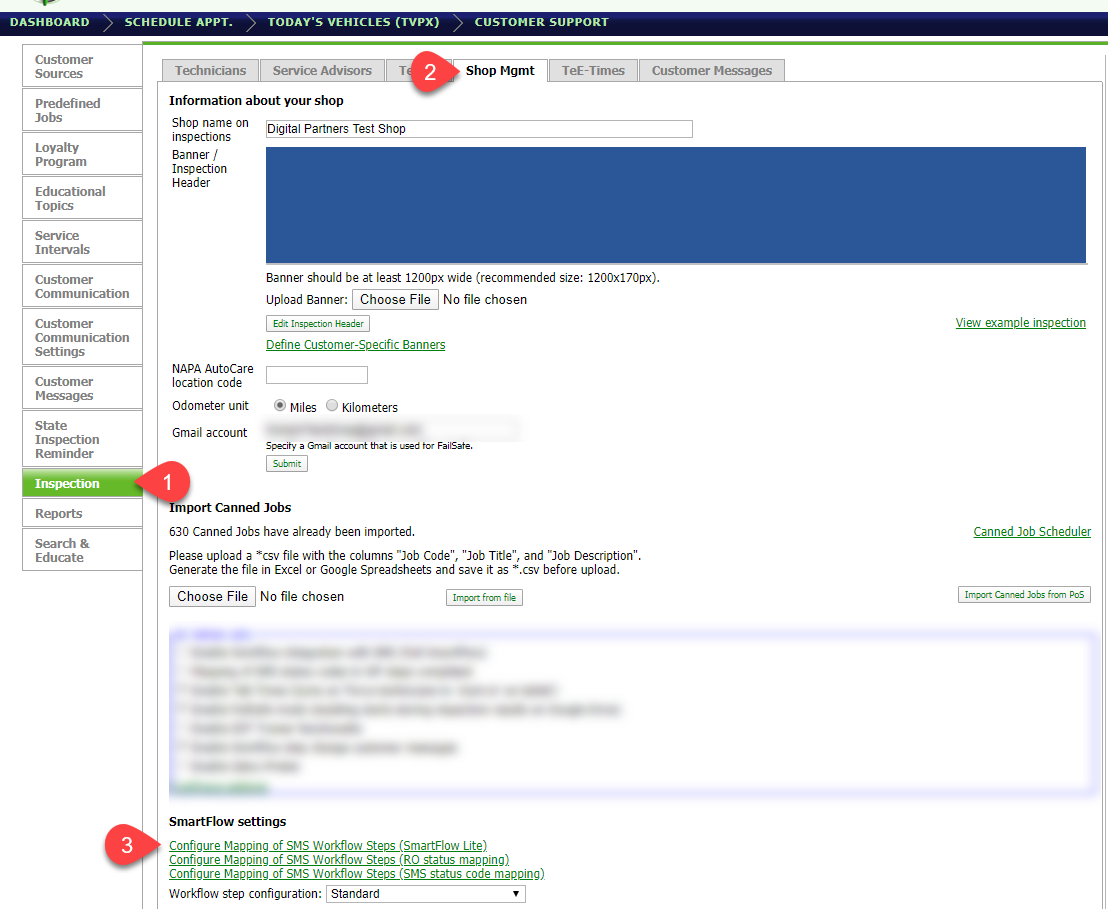
- Go to Inspection Settings
- Click the Shop Mgmt Tab
- Click Configure Mapping of SMS Workflow Steps (Smartflow Lite)
From the popup:
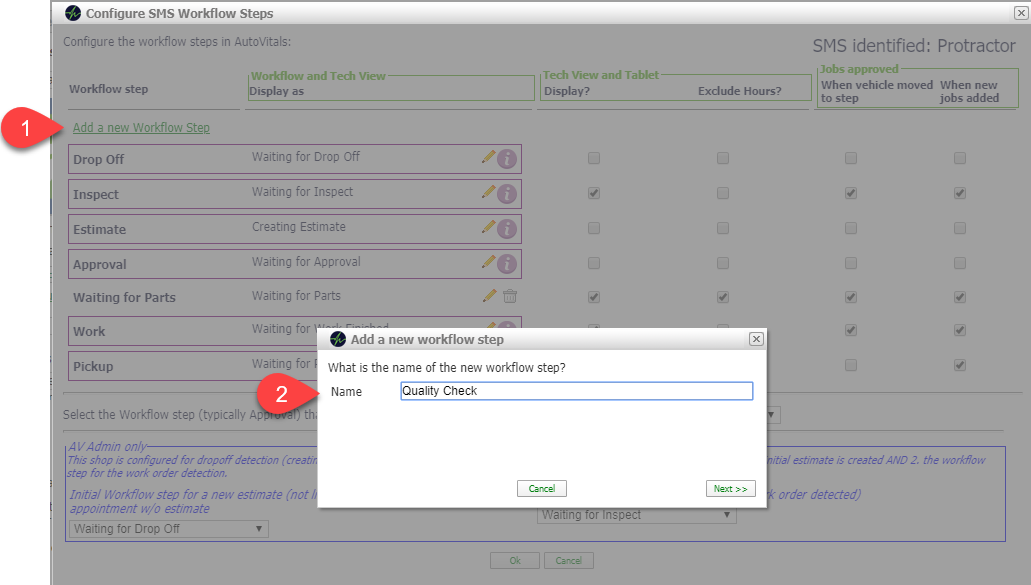
- Click Add a new Workflow Step
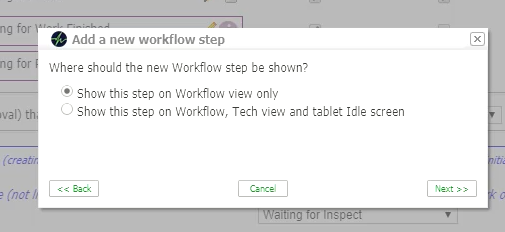
- Follow the prompts to create the step
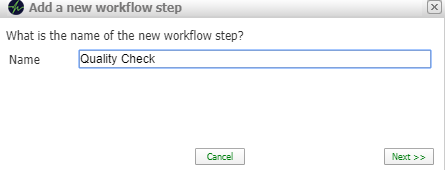
Name the step
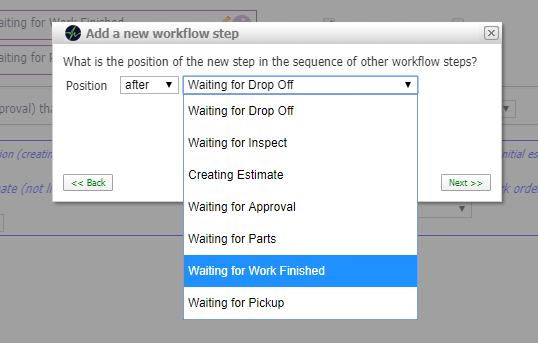
Select from the drop-down list where in the workflow the new step belongs
When the “Show this step on Workflow view only” is selected the vehicle will appear in the “Not Active” column on the Tech View.
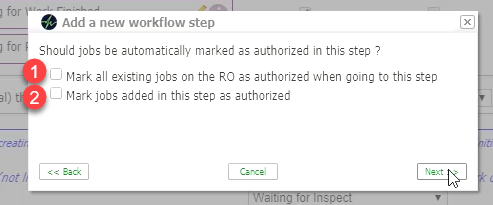
Configure job authorization settings
-
-
- Check this box if you want all jobs that are not yet authorized to be authorized when the vehicle moved to this step. This is typical for the waiting for work finished step because once the approval has been received you want to authorize the appropriate jobs for the technician.
- Check this box if you want any jobs that are added to the work order in the PoS to be automatically authorized while in this workflow step.
-
Editing workflow step specific settings
- Go to Inspection Settings
- Click the Shop Mgmt Tab
- Click Configure Mapping of SMS Workflow Steps (Smartflow Lite)
From the popup:
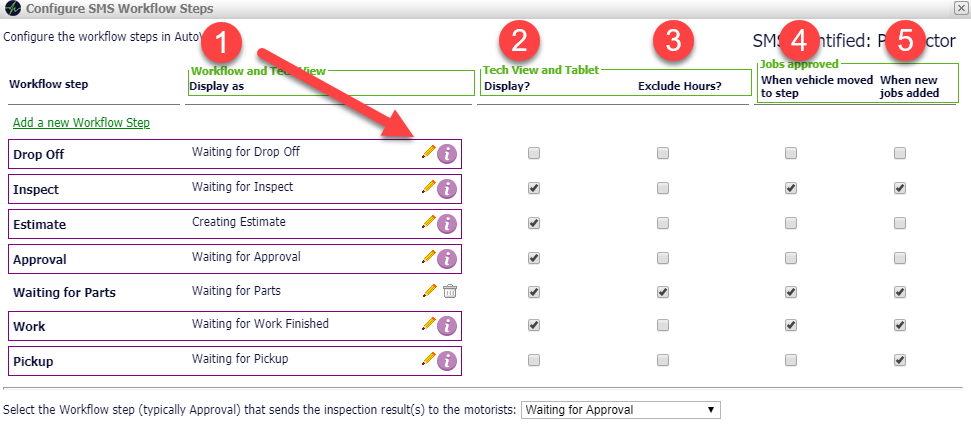
- Display As: Click to edit the name of the workflow step or the position in which it appears on the list
- Note: the name can only be edited for workflow steps that you created unless you need a more customized workflow setup. Speak to your AutoVitals Advisor or Trainer about a workflow consultation.
- Display: This should remain unchecked for workflow steps that should not have a technician working on the vehicle, such as Waiting for Drop Off, Sublet, or Waiting for Pickup
- Exclude Hours: Checking the exclude hours checkbox results in excluding certain workflow steps from being a part of the aggregated yet-to-be-completed hours (2) on the top of the technician’s column. You may opt for this option if you want to exclude all hours from jobs that are still pending and may not be ready for the tech to work on at the current time. Example workflow steps that you should exclude are Waiting for Parts. Steps that should NOT be excluded are Waiting for Inspect, Waiting for Work Finished.
- Jobs Approved when vehicle moved to this step: Check this box if you want all jobs that are not yet authorized to be authorized when the vehicle moved to this step. This is typical for the waiting for work finished step because once the approval has been received you want to authorize the appropriate jobs for the technician.
- Jobs approved when news jobs added: Check this box if you want any jobs that are added to the work order in the PoS to be automatically authorized while in this workflow step.