
Turn your Phone to Landscape
![]()
Smart Markers are important for any shop that wants to create an all around more efficient workplace. If you want to have an inspection sheet that is automatically configured based on what jobs are on the work order, follow the steps below!

Solution
Using Smart Markers through Special Markers and Canned Jobs
In order to utilize Smart Markers through Special Markers and Canned Jobs, you must have canned jobs, and have them imported into AutoVitals.
- Go to the Shop Management Tab under Inspection settings.
- To get here, click the gear button on your TVP
- On the bottom of your shop management tab, click on “configure Special Markers for TVP tiles”
- Type a name and description. Select the inspection sheet to assign. Select an image for the special marker. (You must have an image on your computer that you wish to use)
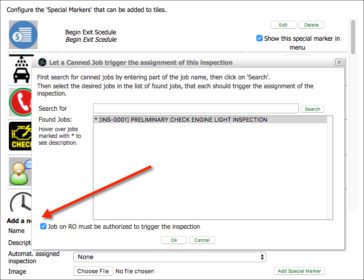
- Click the “+ job” icon, and then search through your canned jobs and select the appropriate one
- The “+canned jobs” button will only show up if you select the inspection you want to add to the special marker (Step 3)
- Jobs are screened during the workflow steps Drop Off and Inspect, in no other workflow step. You have the ability to define whether they have to be authorized (default) or just be on the work order.
- Now you’re done! From now on, every time the configured canned job is defined on the initial work order, the special marker will automatically show up on the tile and the configured inspection sheet will be assigned to the technician.

Using Smart Markers through Concerns
- Go to the Shop Management Tab under Inspection settings
- To get here, click the gear button on your TVP.
- On the bottom of your shop management tab, click on “configure Special Markers for TVP tiles”
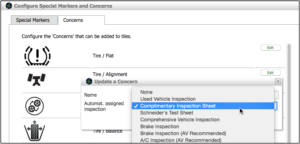
- Click on the concerns tab at the top.
- Find the concern you would like to edit and click the “edit” button to add the inspection sheet from the list
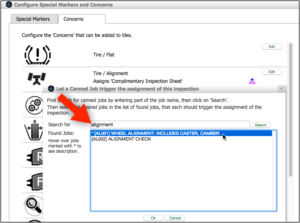
4. Click the “+job” icon, then search through your canned jobs and select the appropriate one
- The “+canned jobs” button will only show up if you select the inspection you want to add to the Concern (Tab 1)
5. Now you’re done! From now on, every time the configured canned job is defined on the initial work order, the concern shows up automatically on the tile and the configured inspection sheet will be assigned to the technician.

Current Process
Without Smart Markers, your shop’s process is slowed down due to the manual work that is needed to decide and dispatch the type of inspections that goes out to each vehicle.
Best Practice
Think of the types of appointments that your shop commonly gets (quick lube, brakes, state inspection, etc.) and use these to make your Smart Markers. For example, a quick lube can get a cursory inspection, while a brake check can get a more part specific inspection like a brake inspection. In this way, because it is automated, each vehicle is still getting inspected, and techs and service advisors aren’t wasting time.
Quantified Benefits
Shops will get more inspections done because it’s easier to get them assigned and customers will gain more trust because they are receiving digital inspections.
DST & Training
During the one-day Digital Supervisor Training, you will experience hands-on how to create inspection results efficiently and how to email and text them to the motorist as part of a new process the Service Advisor will need to develop muscle memory for.
Check out the location in your area and where you can sign up for the Digital Supervisor Training here!
Didn’t Find what you were looking for?
- V5.0.12 Topic and Photo/Image/Notes Editor - April 9, 2019
- Changing your PoS Server Guidelines - February 28, 2018
- Lost Customer Email Campaign - October 2, 2017